Article: Install and configure IIS 6.0 to serve ASP, ASP.NET and static pages
(Kristofer Gafvert, November 4, 2005)Introduction
This article will guide you through installing IIS 6.0 on Windows Server 2003, and show you how to avoid common mistakes and explain some of the new features available in IIS 6.0. The outcome of this article is to have a web server running IIS 6.0 that will serve ASP, ASP.NET and static content. Although this sounds trivial (and was trivial on Windows 2000), it requires some additional steps in IIS 6.0.
For this article I will be using a default installation of Windows Server 2003 Standard Edition with service pack 1 installed and with antivirus software installed (Symantec Antivirus Corporate Edition). The reader should before continuing have installed Windows Server 2003, service pack 1 for Windows Server 2003, AV-software and logged on as a user member of the administrator group.
Pre-installation
Before we start the installation of IIS there are a few things we need to do. One of them is to secure the operating system (OS). That means we need a firewall, antivirus software and update the OS. The system I am using when writing this article is already behind a hardware firewall, but for additional security (and to show the reader) the built-in firewall is enabled as well. A very important notice is that you should not open up any ports in the firewall, not even port 80, before the installation. Although IIS 6.0 is locked down by default, and no known security issues impacts IIS during installation (when writing this) it is wise to first properly configure IIS and then publish it.
Follow these steps to enable the firewall:
- Click "Start", "Control Panel" and then "Windows Firewall"
- If you are asked to start the "Windows Firewall/Internet Connection Sharing" service, do so.
- When you see the Windows Firewall dialog, select "On".
- Click on the Exceptions tab and make sure that no ports are open (at least no ports related to IIS, you may have other ports for other applications opened during the installation of IIS)
- Also check the Advanced tab, and the Settings button for "Network Connection Settings"
- Click Ok

Once the firewall is enabled, it is time to visit Windows Update and get the latest updates.
- Click "Start" and then "Windows Update"
- Follow the instructions
The last step in this section is to install and/or update an antivirus program. Do note that the antivirus software should be designed to be used on servers. Antivirus software designed for home users will not install on a server edition of Windows, or may not work well with IIS.
The installation
IIS can be installed in two ways, either by using the "Manage Your Server" wizard, or by using "Add/Remove Windows Components". In this article, I will show you how to use "Manage Your Server".
- Start "Manage Your Server" by clicking on "Start" -> "Administrative Tools" -> "Manage Your Server"
- When you see the "Manage Your Server" screen, click on "Add or remove a role".

You will now see a screen telling you what steps you should have completed before continuing.
- Click "Next"
If you are asked to unblock the "Configure Your Server Wizard" program, you can select to keep blocking it; it will not impact the installation of IIS.
- On the "Server Role" screen select "Application Server" and click "Next".
The next step is to enable ASP.NET. You can also enable FrontPage Server Extensions if you want. This is useful if you will use for example Visual Studio to publish your website. This article does however not cover FrontPage Server Extensions.
- Select "Enable ASP.NET" and click "Next"
A summary will be presented to you, and the installation will start after you click Next.
- Click "Next"
You may be asked for the Windows Server 2003 CD during the installation, so keep it nearby.
When the installation has finished, click the "Finish" button.
Post-installation
Once IIS is installed, you will probably want to check if it is running and working as expected. To do so, we can simply browse to http://localhost/ on the machine itself. Localhost refers to the local machine, and can only be used on the machine itself. It cannot be used to access other machines.
If you do this using Internet Explorer you will see an "Under Construction" page. This indicates that IIS is installed and can process requests. It also means that we have not yet created a default page for our website.
A "Default Page" is a page that will be served when no file name is specified. To create a default page for the root of your website, you first need to create the page (using for example notepad.exe) and save it to the website's root folder. By default, the website's root folder is C:\Inetpub\wwwroot. A website's root folder can be modified at any time using IIS Manager.
IIS Manager is used to configure IIS. To start IIS Manager follow these steps:
- Click "Start" -> "Administrative Tools" -> "Internet Information Services (IIS) Manager"

If you right click "Default Web Site" and click Properties you will see the properties for the default website. The "Home Directory" tab is where you change the home directory (sometimes also called "root folder") for the Default Web Site.

The Documents tab is where you can change what document that should be the default document. In the image below you can see that Default.htm is the default document, and if this file does not exist, it is Default.asp, and so on.
So what we need to do is create a file Default.htm, and place it in the C:\Inetpub\wwwroot folder. Or...we do not need to do this. We can, as I said earlier, change the home directory to something else, and we can also give the default document any other name as long as we add it to the list of "Default Documents". But to keep this simple, the default location and name is used.
Simple does not always equal secure. It is recommended to move the website's root to a non-system drive, for example D:. This adds an extra layer of security, but using the C: drive is in no way insecure.
You can use your favorite text editor to create a HTML file and save it to C:\inetpub\wwwroot (make sure you don't get the extension .htm.txt if you use a text editor), or you can use the Default.htm file in the ZIP-package you can download at the bottom of this article. Once this file is placed in the home directory, and you browse to http://localhost/ you will see the content of the default document.
So now we have a default document. The goal of this article was however to get the server to serve static pages, ASP and ASP.NET. Static pages and ASP.NET should work at this moment (IIS serves static pages by default, and ASP.NET was enabled during the installation). But just to make sure that it works, browse to http://localhost/default.htm.
To test ASP.NET, either create a simple "Hello World" ASP.NET file, or use the one supplied in the ZIP-package available for this article. Remember to keep the file simple when testing if ASP.NET is working on the server. If you used the file from the ZIP-package, placed it in C:\inetpub\wwwroot and then browsed to it you should see a "Hello World" message, which indicates that ASP.NET is working on the server.

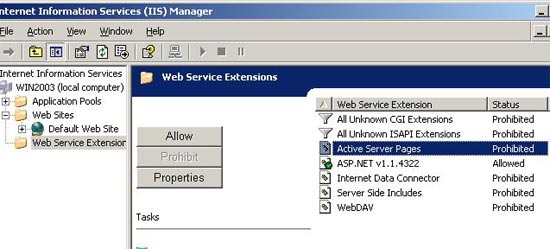
ASP-files will however not work out-of-the-box. If you tried to browse an ASP-file you would get a "404 File Not Found" reply from the server. To use ASP-files on the server you must first allow the ASP web service extension. This is done from IIS Manager.
- In the left pane of IIS Manager, click on "Web Service Extensions"
- In the right pane, click "Active Server Pages"
- Click the Allow button.
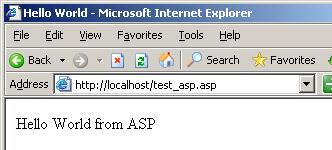
You can now test that ASP works with the test_asp.asp file in the ZIP-package, or use your own ASP file.
At this moment IIS is configured to serve ASP, ASP.NET and static files. The goal is reached! The website can however not be accessed from another machine, since port 80 is closed. For that to be possible, port 80 must be opened. Before you open port 80, visit Windows Update again, and make sure that no update related to IIS is published.
To open port 80 follow these steps (you should not do this if you only want to use IIS locally):
- Click Start -> Control Panel -> Windows Firewall
- Click on the Exception tab
- Click "Add Port..." button.
- As Name, write "IIS HTTP" (or something else) and Port Number should be 80.
- Click Ok twice
The website can now be accessed using the web server's IP. For example http://192.168.0.3 if the server's IP address is 192.168.0.3.
Checklist
- Enable a firewall
- Visit Windows Update
- Install and update antivirus software
- Install IIS
- Configure IIS
- Visit Windows Update
- Open port(s) in the firewall (optional)
What's next
If you plan to run a public website the next step is probably to buy a domain name. Once you have gotten IIS up and running, and you can access the website using your external IP from an external machine it is simple to use a domain name. All you actually need to do is point the domain name to the public IP. The article Make your website public explains more how to setup and run a public website.
Resources
Files related to this article
Recreate default website
ASP.NET missing from Web Service Extensions
ASP files generates "404 - File or directory not found"
How to allow users to download exe-files